|
|
 02 November 2006, 21:24
|
#1
|
|
Member
Country: Other
Town: Stanley, Falkland Is
Boat name: Seawolf
Make: Osprey Vipermax 5.8
Length: 5m +
Engine: Etec 150
Join Date: Mar 2006
Posts: 3,726
|
Bodge up coming up - will it work though?
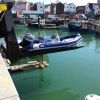
To get me back in the water for a month or so until I can get the bits I need to fix my holy toob, I'm concocting a bodge up.
Here it is as it looks at the moment, perhaps difficult to see but major fabric structural failure in progress along the middle of the damaged area and out to both sides. The cone on the starboard side I think is heading the same way and the whole problem is due to the seams on the cone end flexing and chafing. Which at the risk of receiving another email titled "Without prejudice"  could attract some negative comment on the design front  but I won't go down that road again....

What I'm thinking is wallop a patch over the top of that (again) good enough to last for a month or six weeks till I can get the whole new tube ends here to try and do a proper repair job, which will involve cutting the ends off the tubes an inch or two in front of the original seam and sticking whole new ends in. Which I am not too confident about doing myself ... but not much option really!
Back to this question. I could do one of two things, clean up the area where the orange top layer has peeled off and stick a small patch on approximately following the outline of the yellow line, which would cover the area where it is actually leaking. Or put a much bigger patch on covering the area outlined by the blue line.

Pros and cons to me seem to be:
Yellow - can be tucked down behind the seam so less of a leading edge, but will the glue stick to the bare fabric now the orange stuff has gone?? May be weaker.
Blue - May be stronger, but leaves a forward facing leading edge that may pick up in the flow of water. May also leak along the seams.
Both are a bodge, but either only need to get me through to maybe early December just so I don't miss the first half of the summer. All the affected area covered by either patch will be in the bin anyway once I get on to the proper repair job, so no real problems from that side.
Any thoughts? Yellow or blue?
cheers 
Stephen
__________________
|

|

|
|
02 November 2006, 21:29
|
#2
|
|
Member
Country: UK - England
Town: Gosport
Boat name: April Lass
Make: Moody 31
Length: 9m +
Join Date: Aug 2001
Posts: 4,951
|
Don't know how many ribs there are in the FI but put it this way, if you pull this off and manage to get new end cones fitted you would become the local expert sitting comfortably in my arm chair I suggest you go for it.
Pete
__________________
.
Ribnet is best viewed on a computer of some sort
|
|
|
|
|
02 November 2006, 21:41
|
#3
|
|
Member
Country: UK - England
Town: Enfield/Switzerland
Boat name: Zonneschijn II/Vixen
Make: Shakespeare/Avon
Length: 7m +
Engine: Evin' 175 DI /Yam 90
MMSI: 235055605
Join Date: May 2006
Posts: 1,436
|
Why either or?
I think I'd go for both. See no reason why the smaller one should not stick, but another patch on top would give me added confidence.
__________________
|
|
|
|
|
02 November 2006, 22:20
|
#4
|
|
Member
Country: Other
Town: Stanley, Falkland Is
Boat name: Seawolf
Make: Osprey Vipermax 5.8
Length: 5m +
Engine: Etec 150
Join Date: Mar 2006
Posts: 3,726
|
Quote:
Originally Posted by Pete7

Don't know how many ribs there are in the FI but put it this way, if you pull this off and manage to get new end cones fitted you would become the local expert sitting comfortably in my arm chair I suggest you go for it. |
Wasn't an area of expertise I was hoping to become involved in 
As Neil says I suppose I could do both hadn't really considered that!
Is the glue likely to stick to the exposed fabric at all though? It feels quite "slippery"
__________________
|
|
|
|
|
02 November 2006, 22:52
|
#5
|
|
Member
Country: UK - England
Town: HERNE BAY
Boat name: Coastalbuzz
Make: Brill Ribcraft
Length: 7m +
Engine: 250suzuki/6/5/5
MMSI: tba
Join Date: Jan 2003
Posts: 328
|
yellow?
I'm looking at your picture and thinking if it was me I would go yellow as I think it could be a problem getting a really good flat lay accros the exsiting seam cover.My only concern was whether the existing fabric will take the glue ok? If not or if you doubt it ,it has to be blue.Make sure the whole lots clean !!!!
good luck, if you pull it off You deserve a pat on the back for perserverance 
__________________
|
|
|
|
|
03 November 2006, 07:39
|
#6
|
|
Member
Country: UK - England
Town: knebworth
Boat name: phoenix
Make: xs
Length: 6m +
Engine: 115 opti
Join Date: Jun 2005
Posts: 193
|
Quote:
Originally Posted by BogMonster
Yellow - can be tucked down behind the seam so less of a leading edge, but will the glue stick to the bare fabric now the orange stuff has gone?? May be weaker.
Blue - May be stronger, but leaves a forward facing leading edge that may pick up in the flow of water. May also leak along the seams.
Both are a bodge, but either only need to get me through to maybe early December just so I don't miss the first half of the summer. All the affected area covered by either patch will be in the bin anyway once I get on to the proper repair job, so no real problems from that side.
Any thoughts? Yellow or blue?
cheers
Stephen |
A Friend of mine had a similar problem to yours and instead of of your proposed "blue" patch we put a new wide strip " width of Blue patch" around the entire tube to re enforce the join and to cover other fabric that looked like it might also fail, that was in 2002 and its still holding fine :-)
Mark
__________________
|
|
|
|
|
03 November 2006, 08:37
|
#7
|
|
Member
Country: Other
Town: Stanley, Falkland Is
Boat name: Seawolf
Make: Osprey Vipermax 5.8
Length: 5m +
Engine: Etec 150
Join Date: Mar 2006
Posts: 3,726
|
Quote:
Originally Posted by mark-f
A Friend of mine had a similar problem to yours and instead of of your proposed "blue" patch we put a new wide strip " width of Blue patch" around the entire tube to re enforce the join and to cover other fabric that looked like it might also fail, that was in 2002 and its still holding fine :-)
Mark
|
Haven't got enough repair fabric available right now to do that though, and it only needs to hold for a few weeks anyway as a bigger job is needed to do it properly otherwise I'll always be waiting for it to go wrong again....
Cheers for the comments, hope the weather is fine on the weekend and I will put my bodging hat on 
__________________
|
|
|
|
|
03 November 2006, 08:42
|
#8
|
|
Member
Country: UK - England
Town: STOKE
Boat name: Humma
Make: Humber Destoyer 5.5
Length: 5m +
Engine: Out b 75 hp Marriner
MMSI: 235068231
Join Date: Sep 2005
Posts: 266
|
Repair
Quote:
Originally Posted by mark-f
A Friend of mine had a similar problem to yours and instead of of your proposed "blue" patch we put a new wide strip " width of Blue patch" around the entire tube to re enforce the join and to cover other fabric that looked like it might also fail, that was in 2002 and its still holding fine :-)
Mark
|
Hi had a series of leaks on a Narwhal rib took it to a rib repair specialist,they had several atemps of repairing it they where useing the wrong glue,my boat as pvc tubes,please check you use correct adsive
__________________
|
|
|
|
|
03 November 2006, 09:26
|
#9
|
|
Member
Country: Other
Town: Oakley
Boat name: Zerstörer
Make: Ribcraft
Length: 5m +
Engine: Suzuki DF 140
MMSI: 235050131
Join Date: Jun 2003
Posts: 3,931
|
Stephen,
Just a little tip that has worked for me well in the past. The leading edge of that repair will be having masses of water pushed against it when on the move. Am I correct.
To stop the water working its way under the patch and lifting it, I've just seen what water can do with large patches put on a tube on my mates RIBCRAFT, My tip is to run a ridge of Super Glue Gel along the front of the ridge just in front of the repair. It does work.
I've a feelling your going to tell me though that you can't get the stuff down there.
Best of luck.
Nick R.
|
|
|
|
|
03 November 2006, 09:28
|
#10
|
|
Member
Country: Other
Town: Stanley, Falkland Is
Boat name: Seawolf
Make: Osprey Vipermax 5.8
Length: 5m +
Engine: Etec 150
Join Date: Mar 2006
Posts: 3,726
|
Quote:
Originally Posted by Biggles
Stephen,
Just a little tip that has worked for me well in the past. The leading edge of that repair will be having masses of water pushed against it when on the move. Am I correct.
To stop the water working its way under the patch and lifting it, I've just seen what water can do with large patches put on a tube on my mates RIBCRAFT, My tip is to run a ridge of Super Glue Gel along the front of the ridge just in front of the repair. It does work.
I've a feelling your going to tell me though that you can't get the stuff down there.
Best of luck.
Nick R.
|
Cheers, I may be able to get some, have seen it in the past, will go for a look. Thanks for the tip
__________________
|
|
|
|
|
03 November 2006, 12:15
|
#11
|
|
Member
Country: UK - England
Town: Dartmouth
Boat name: TIDEL III
Make: AVON SEARIDER
Join Date: Jun 2003
Posts: 823
|
stephen put the yellow patch on first making sure you prime the delaminated area properly when that has cured inflate the tube and put the blue patch on then grind down the leading edge of the blue patch and either sikaflex or glue over the leading edge ,not pretty but should do the job .
__________________
|
|
|
|
|
03 November 2006, 15:35
|
#12
|
|
Member
Country: USA
Town: Oakland CA
Length: 3m +
Join Date: Feb 2005
Posts: 6,653
|
Quote:
Originally Posted by Biggles
Stephen,
To stop the water working its way under the patch and lifting it, I've just seen what water can do with large patches put on a tube on my mates RIBCRAFT, My tip is to run a ridge of Super Glue Gel along the front of the ridge just in front of the repair. It does work.
|
Rather than superglue, (cyanoacrylate, which dries fairly brittle), try using a urethane based adhesive (Aquaseal, Sikaflex, any of those.) They stay pliable, and, assuming good surface prep, stick really well.
jky
__________________
|
|
|
|
|
03 November 2006, 15:55
|
#13
|
|
Member
Country: Other
Town: Oakley
Boat name: Zerstörer
Make: Ribcraft
Length: 5m +
Engine: Suzuki DF 140
MMSI: 235050131
Join Date: Jun 2003
Posts: 3,931
|
Jyasaki,
At the risk of starting an arguement. This is a tip I pulled off this forum last year. I tried it myself on my Old searider and it worked 100 % right up until I sold the boat. Best bit is its a lot more inconspicuos than Silkaflex.
Either way, yours or mine, I hope one of them works for Stephen and gets him out of the cack.
|
|
|
|
|
03 November 2006, 18:05
|
#14
|
|
Member
Country: USA
Town: Oakland CA
Length: 3m +
Join Date: Feb 2005
Posts: 6,653
|
No offense taken, and it's more of a whatever works kind of thing. Didn't mean to step on your toes, either.
jky
__________________
|
|
|
|
|
03 November 2006, 18:28
|
#15
|
|
Member
Country: Other
Town: Stanley, Falkland Is
Boat name: Seawolf
Make: Osprey Vipermax 5.8
Length: 5m +
Engine: Etec 150
Join Date: Mar 2006
Posts: 3,726
|
Thanks for the suggestions I'll have a fresh tube of Sikaflex open anyway because my new double jockey seat arrived from Humber today (very nicely made and finished too, I have to say) so I'll be sticking that to the floor in the blunt end once the tube has been bodged.
What it looks like doesn't matter on this occasion because its going to be under the water when the boat is in the water, and that whole bit of tube will meet the wrong end of a large cutting tool when I get the new tube ends from Paul Tilley anyway, so it'll be gone for good then! I'll be cutting them off an inch or two ahead of the forward-most seam to get rid of any chance of more problems related to the original seams, which seem (pardon the pun) to be the weak point in this boat.
The really annoying thing in all this is that I still think if the original design had incorporated wear patches from when it was built, the tube would have been so much stiffer and none of this would have even started.....
Moral of the story: go and look at your boat and if it doesn't have wear patches reinforcing the area that gets battered by the water at speed, FIT THEM NOW. You do not want this aggravation.... trust me you do not.
__________________
|
|
|
|
|
03 November 2006, 18:43
|
#16
|
|
Member
Country: Other
Town: Oakley
Boat name: Zerstörer
Make: Ribcraft
Length: 5m +
Engine: Suzuki DF 140
MMSI: 235050131
Join Date: Jun 2003
Posts: 3,931
|
Stephen,
Your right. My mates Searider developed this problem and it was then I decided to fit some wear patches. Although not perfect they took the brunt of any wear so after a day with the odd bit coming loose I could reglue the wear patch and not have to worry about the more difficult, if not impossible to repair, cone join.
The super glue trick worked a treat in keeping the wear patch on.
As you have suggested you don't want this problem. I personally would fit the wear patch and do the super glue trick to anyone that has older tubes.
Best of luck,
Nick R.
|
|
|
|
|
03 November 2006, 19:12
|
#17
|
|
Member
Country: Other
Town: Stanley, Falkland Is
Boat name: Seawolf
Make: Osprey Vipermax 5.8
Length: 5m +
Engine: Etec 150
Join Date: Mar 2006
Posts: 3,726
|
Nick do you actually put the bead of glue along the edge of the patch to take off the "sharp edge" or is the idea to put it a mill or two ahead of it to deflect the water flow up over the leading edge of the patch? Got any pics of what you did/how big the bead was etc?
cheers
Stephen
__________________
|
|
|
|
|
03 November 2006, 19:41
|
#18
|
|
Member
Country: Other
Town: Oakley
Boat name: Zerstörer
Make: Ribcraft
Length: 5m +
Engine: Suzuki DF 140
MMSI: 235050131
Join Date: Jun 2003
Posts: 3,931
|
Stephen,
I don't have the boat anymore. But what I did was put the bead of glue just in front of the patch. Probably no more than .5 of a mm. I don't suppose it would hurt if you ran the glue along the seam. It must be Super glue Gel not the ordinary stuff.
Its just acting like a deflector to take away the force of that water at 50 mph etc. Trust me it does work and it works well. Just make the patch is really smooth where it joins the tube. I suppose you really need to make sure that the glue at all points protects the patch seam.
The height/size of the bead was the same height as the patch. Its so simple everyone should do it. It costs about £2 to avoid hundreds of pounds future problems.
Its something I'm going to do soon on my new boat.
|
|
|
|
|
03 November 2006, 20:19
|
#19
|
|
Member
Country: Canada
Town: Tobermory, Canada eh
Boat name: Verius
Make: Zodiac Hurricane 590
Length: 5m +
Engine: Yamaha F150
Join Date: Oct 2006
Posts: 1,366
|
Quote:
Originally Posted by Biggles
To stop the water working its way under the patch and lifting it, I've just seen what water can do with large patches put on a tube on my mates RIBCRAFT, My tip is to run a ridge of Super Glue Gel along the front of the ridge just in front of the repair. It does work.
|
Along the same lines, I had a heavy patch added to the underside of my tube in about the same place. To minimize the resistance, the techie also put a very light patch over the lead edge of the heavy patch. That was three years ago, and there is no sign of it letting go...
Also, in answer to your original question, my belief is that these adhesives stick rubber-to-rubber, not rubber to fabric, so you are probably best to use the larger patch. Up here, we have a product called Aquaseal which is used to repair wetsuits, shoes etc. I have seen it used to coat fabric areas on inflatables (but not to stick a patch on). I wonder if something like this over the exposed fabric, but under the patch, would help to keep the fabric from getting saturated...
S
|
|
|
|
|
03 November 2006, 21:03
|
#20
|
|
Member
Country: UK - England
Town: IoW
Make: HysuCat 6.5
Length: 6m +
Engine: 2 x Yamaha 70 2s
Join Date: Oct 2004
Posts: 71
|
seems harsh but....
could you cut a hole in the back cone at the top, and repair the patch from the inside, 
then patch the hole you made, easier as its above water level, with minimum resistance.
i have also seen smears of sikaflex fix surprising holes as long as its not under tension. looking at your pictures it might work, but its abit of a last option.
best of luck
__________________
|
|
|
|
|
|
 Posting Rules
|
You may not post new threads
You may not post replies
You may not post attachments
You may not edit your posts
HTML code is Off
|
|
|
|
 Recent Discussions
 |
|
|
|
|
|
|
|
|
|
|
|
|
|
|
|
|
|
|
|
|
|
|
|
|
|
|
|
|
|
|
|
|
|


 2006 Humber Destroyer
 Humma
Humma