|
|
 13 June 2010, 01:19
|
#1
|
|
Member
Country: Canada
Boat name: Mk2
Make: Zodiac
Length: 4m +
Engine: 7.5hp Honda 4stroke
Join Date: Jun 2010
Posts: 14
|
New Guy, deflating problem; early 80's mk2
Let me start by saying hello to everyone. I live in the Yukon which is in Northern Canada.
My Dad bought a Zodiac about 25 years ago. 14' mk2 I believe. I will post up some pictures later if possible.
Now onto the problem....deflation. I did a quick look around today with some soapy water and a paint brush. I didn't see any obvious leaks. But within an hour of pumping her up, you can start to feel her softening. I would really like to keep this boat in the family and in good running condition. She has the original oars, & floor boards. Though they too could use some restoration. This week I glued on an oar lock(as well as the piece that the paddle blade sits in). The repair seems to have gone pretty good. The old man thought I was crazy taking a belt sander to the pontoon but it made quick work of it. Just kind of nibbled away a little at a time.
I hope I can find what I am looking for here. If not, at least I am having fun doing it!
__________________
|

|

|
|
13 June 2010, 01:28
|
#2
|
|
Member
Country: USA
Town: Oakland CA
Length: 3m +
Join Date: Feb 2005
Posts: 6,653
|
Deflate, remove the floor, and spray, rather than paint, with soapy water. Use something like a garden sprayer (couple-gallon cannister, hand pump, and trigger sprayer), and go over everything you can reach that holds air. That includes valves (actually, you may want to start with the valves, after 25 years.) Use a soap mix that bubbles easily (use a straw and blow into it - you should get a good mound of bubbles; if you don't, add more soap. Dishwashing liquid works well. If nothing shows up, flip it over and hit the bottom of the tubes.
jky
__________________
|
|
|
|
|
13 June 2010, 01:36
|
#3
|
|
Member
Country: Canada
Boat name: Mk2
Make: Zodiac
Length: 4m +
Engine: 7.5hp Honda 4stroke
Join Date: Jun 2010
Posts: 14
|
I suspected the valves too but with the boat pumped up to the red line, I painted the valves and didn't see anything as far as seepage. The wood floor is not in the boat now.
The boat spent most of it's life in the bag folded up.
Is there certain problem areas that I should focus on more than others, yes the valves I know, but any others?
Thanks again for all the advice and help!
__________________
|
|
|
|
|
13 June 2010, 03:02
|
#4
|
|
Member
Country: Canada
Boat name: Mk2
Make: Zodiac
Length: 4m +
Engine: 7.5hp Honda 4stroke
Join Date: Jun 2010
Posts: 14
|
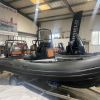
First Photo
I did go out, re-inflate her, and changed one piece of one valve that you can just screw in and out. Also snapped a picture of her without the floor and oars. I don't know why but I really like the look of a zodiac. I believe on the back it was dated 1985 model year fwiw.

__________________
|
|
|
|
|
14 June 2010, 14:01
|
#5
|
|
Member
Country: Canada
Town: British Columbia
Make: Gemini
Length: 4m +
Engine: 40hp 2 str
Join Date: Oct 2003
Posts: 2,151
|
Nice looking boat! Following jyasaki's advice about the soapy water spray definitely should help you pinpoint the sourced of the air leakage.
Hard to say for sure from the picture, but it looks like the boat is made with hypalon fabric. It was around 1985 when zodiac started using PVC in their recreation model line up. It is importan to use the glue and patch fabric that are specific to the fabric type of the boat. Are the valve bodies made of plastic or chromed brass? If chromed brass, it is probably a grand raid model and almost certainly made of hypalon. If plastic, it could be either fabric.
__________________
|
|
|
|
|
14 June 2010, 16:00
|
#6
|
|
Member
Country: Canada
Boat name: Mk2
Make: Zodiac
Length: 4m +
Engine: 7.5hp Honda 4stroke
Join Date: Jun 2010
Posts: 14
|
I am not sure what you mean by the Valve bodies. What I can tell you about the valve is that the outsides are black plastic, whilst if you look inside, they appear to be brass or something. I did locate a few tiny pinhole leaks in the inflatable keel right where it touches the transom at the stern. Not too concerned about those right now though. I noticed them as I was hosing the grits out, I heard a hissing noise and located the leaks in the keel. No such luck with the big pontoons yet.
__________________
|
|
|
|
|
16 June 2010, 16:33
|
#7
|
|
Member
Country: Canada
Boat name: Mk2
Make: Zodiac
Length: 4m +
Engine: 7.5hp Honda 4stroke
Join Date: Jun 2010
Posts: 14
|
So I talked to the old man about the boat. He claimed it was hypalon. Also confirmed it is the Grand Raid model...Get this, back in the mid 80's when he purchased the boat; it was only $3000!
I would like more information about the valves. As I suspect they are the main culprit of leaking(though I haven't confirmed this yet). Can they be rebuilt, replaced?
Zodiac's seem to be a bit of a black art here. The local dealer is no help what so ever. It's like they sell Zodiac's, but if you have a problem with it we can't fix it of help you fix it.
I am pretty much at the mercy of this forum as to what I need to know...hope you guys can help me...
__________________
|
|
|
|
|
16 June 2010, 21:35
|
#8
|
|
Member
Country: USA
Town: Oakland CA
Length: 3m +
Join Date: Feb 2005
Posts: 6,653
|
Any rafting companies/outfitters nearby?
You'd be surprised at how much their stuff parallels ours...
That said, if you can get some pictures of the offending (or at least suspected offending) valves, someone should be able to suggest a course of action.
But the soapy water thing should really be able to locate your problem (whether it's the valves or not...)
jky
__________________
|
|
|
|
|
17 June 2010, 04:15
|
#9
|
|
Member
Country: Canada
Town: British Columbia
Make: Gemini
Length: 4m +
Engine: 40hp 2 str
Join Date: Oct 2003
Posts: 2,151
|
I'd also like to see more detail pictures. Does the valve housing look like the one in this picture, or is it all plastic? Can you show us a close up picture of the transom plate?
__________________
|
|
|
|
|
17 June 2010, 09:33
|
#10
|
|
Member
Country: USA
Town: Anchorage
Make: Zodiac MKIII GR
Length: 4m +
Engine: Johnson 25
Join Date: Oct 2009
Posts: 63
|
As prairie tuber suggests, and by the looks of your Zodiac I would suspect that you have a Grand Raid model MKII Zodiac made from Hypolon
. Especially given the year code you have supplied.
After having spent the better part of 6 months learning everything I can about a similar vintage GR MKIII I can offer up a couple of things. First off, your Dad was correct
put the belt sander away! For patches you should mark out the outline with a ball point pen and hand sand with 80 grit wet or dry paper. Wipe off with a rag moistened with toluliene (incorrect spelling I am sure) and then apply your two part hypolon contact cement to both the patch and boat. When just dry to touch, apply patch to boat. Power sanding is bad for a couple of reasons. First it is far more aggressive than needed, its hard to control, builds up heat and can end in disaster faster than you can blink an eye
..
For your leak issue try pulling out on the valve assembly to expose a portion of the inner valve cone and apply some grease type lube with an acid brush. It only takes a small amount so dont go crazy with it
. I used DC-33 but pretty much anything will work as long as you dont use a bunch. While pulling out on the valve with a small amount of pressure, it should now rotate from Navigation to Inflation with ease. Rotate each valve back and forth a bunch of times this way to kind of spread that grease around inside the cone area of the valve.
Note that these military style valves also incorporate an inner spring that allows the valves to operate as an over pressure pop-off in the event of over pressure doo to the thermal heating of the tubes in the sun, or excessive pumping when filling the boat. When you pull out on the valve, you are simulating this pop-off action of the valve.
When closing the valve with the little arrow pointing at the center of the green navigation zone, be sure to remove the outer cap and check valve from the main valve knob and listen for leakage coming from within the valve housing. Even though the arrow is pointed in the green navigation zone, there is a very minimal area for it to properly index and stop leaking. Once you find that by listening to the leakage, or lack thereof, then reinstall the check valve and cap and you should be good to go.
__________________
|
|
|
|
|
17 June 2010, 14:31
|
#11
|
|
Member
Country: USA
Town: Oakland CA
Length: 3m +
Join Date: Feb 2005
Posts: 6,653
|
Quote:
Originally Posted by Alangaq

Wipe off with a rag moistened with toluliene (incorrect spelling I am sure) and then apply your two part hypolon contact cement to both the patch and boat. When just dry to touch, apply patch to boat.
|
Toluene is the correct spelling; note that a) Toluene is pretty nasty stuff - be careful with it if you use it; b) Toluene can be hard to find (at least here in the US; don't know about Canada), so MEK makes a good substitute (also note that while MEK is better than Toluene healthwise, it isn't by much, so the same warnings apply.)
Rather than a single layer of glue, follow the adhesive manufacturer's directions (usually 2 or 3 coats with drying time between; last coat allowed to just tack off before assembling parts. Follow with as much pressure as you can get on the join in order to bond the two adhesive treated parts together.)
I agree with the no power sanding part, unless you have a huge repair area, in which case use a not-very-aggressive cutting medium, and go really slow...
jky
__________________
|
|
|
|
|
22 June 2010, 19:46
|
#12
|
|
Member
Country: Canada
Boat name: Mk2
Make: Zodiac
Length: 4m +
Engine: 7.5hp Honda 4stroke
Join Date: Jun 2010
Posts: 14
|
Thanks for the great advice guys...can't say that enough. Today I will go out and take some pictures of the valves. I can tell you there are no 'chromed' pieces. The Valves are black plastic on the outside. But I will take a shot of two for you guys to study 
The reason I used the belt sander was this...on the glue(can't recall the name but it was a 2 part glue with a bottle of hardener, and required 3 coats) it stated the repaired area should be showing fabric. I started with some meduim grit paper and was sanding by hand for about 10 minutes. Looked like it was going to take a long time so I fired up the belt sander(must be the carpenter in me...lol). I think next time I will try the hand held rotary tool though.
__________________
|
|
|
|
|
22 June 2010, 21:40
|
#13
|
|
Member
Country: Canada
Boat name: Mk2
Make: Zodiac
Length: 4m +
Engine: 7.5hp Honda 4stroke
Join Date: Jun 2010
Posts: 14
|
Valve Photo's
__________________
|
|
|
|
|
22 June 2010, 23:05
|
#14
|
|
Member
Country: USA
Town: Oakland CA
Length: 3m +
Join Date: Feb 2005
Posts: 6,653
|
Quote:
Originally Posted by Phil'sFrontier
The reason I used the belt sander was this...on the glue(can't recall the name but it was a 2 part glue with a bottle of hardener, and required 3 coats) it stated the repaired area should be showing fabric.
|
I have never heard of that before. Every glue I've used specifically says *not* to go down to the reinforcing fabric.
Assuming the glue is compatible with the outer material layer, all you need to do is key it up a bit (i.e. scuff it) to give it a bit of tooth for the glue to hang on to.
I'd be interested in hearing what glue you used.
jky
__________________
|
|
|
|
|
23 June 2010, 18:18
|
#15
|
|
Member
Country: USA
Town: Anchorage
Make: Zodiac MKIII GR
Length: 4m +
Engine: Johnson 25
Join Date: Oct 2009
Posts: 63
|
Those valves look pretty similar to mine and I am pretty sure they are the military style. There is most assuredly a sweet spot when you turn that knob to navigation that will stop all leakage from the valve (at least on mine) but it is a very minute thing
if you rotate the knob a couple of degrees either side of that sweet spot you will hear leakage coming from the valve. After inflation I close each valve listening for the leakage to stop, and only then do I install the outer check valve and cap. The check valve and caps that I have do have o-rings on them, but still will allow for some noticeable pressure loss overnight if I dont have the main valve positioned perfectly.
Did you try pulling out on the valves and lubing them? That should help with the leakage I would think.
__________________
|
|
|
|
|
23 June 2010, 18:22
|
#16
|
|
Member
Country: USA
Town: Anchorage
Make: Zodiac MKIII GR
Length: 4m +
Engine: Johnson 25
Join Date: Oct 2009
Posts: 63
|
Also... that pressure guage in you picture is exceedingly cool!! I wish I could find one of those!
you will also note that if you look inside your valves that you can see the ports in there. shoot some kind of lube in there and work the valve back and forth.
__________________
|
|
|
|
|
23 June 2010, 19:02
|
#17
|
|
Member
Country: UK - Wales
Town: new quay
Boat name: fishery patrol
Make: zodiac
Length: 4m +
Join Date: Jun 2010
Posts: 13
|
Hi there. I had this problem when i first had my zodiac. Try turning each valve to gonflage after inflating- continuing to try and pump it should now become almost impossible. Also if you listen carefully to the valve as you turn it 360, you can here when the valve is seaping and and when it seals closed. hope this helps.
__________________
|
|
|
|
|
23 June 2010, 19:48
|
#18
|
|
Member
Country: Canada
Boat name: Mk2
Make: Zodiac
Length: 4m +
Engine: 7.5hp Honda 4stroke
Join Date: Jun 2010
Posts: 14
|
Yesterday when it was pumped up I noticed that one side seemed more deflated(I pumped up the boat and left the valves on navigation). When I turned the valve back to inflation on the left side it seemed to take air from the bow. Again when I turned the right valve to inflation it seemed to have air taken out and into the left pontoon. I think the next step is to spray the boat down and locate any leaks. Now I know to concentrate on the valves, as well as the left side of the boat.
The Pressure gauge in the picture is the original.
The oars are another story...they are both in working condition, however one is missing a screw(easy); and both oars could use some glass work to repair cracks on the blades.
__________________
|
|
|
|
|
24 June 2010, 19:17
|
#19
|
|
Member
Country: UK - Wales
Town: new quay
Boat name: fishery patrol
Make: zodiac
Length: 4m +
Join Date: Jun 2010
Posts: 13
|
the valves are "intercommunication / inflation valves" hence why the air in going from one chamber to the other- eventually each chamber will have the same pressure if you continue to 'play' around with the valves before inflating any more. I am pretty convinced that your problem lies with the position of each valve rather than any punctures as like you said, you have already looked for these.
__________________
|
|
|
|
|
26 June 2010, 16:12
|
#20
|
|
Member
Country: Canada
Boat name: Mk2
Make: Zodiac
Length: 4m +
Engine: 7.5hp Honda 4stroke
Join Date: Jun 2010
Posts: 14
|
I am really suspecting the valves now. I did another search for leaks. Didn't find anything really. May have found one small tinnie tiny leak but nothing accounting for the air loss I am achieving.
Using my exceedingly cool pressure gauge I pump the boat to maximum recomended pressure. I can come back in an hour and the boat will be pretty well right out of the green zone on the gauge.
I suspect the main culprit to be valves as well....back to the drawing board...lol
__________________
|
|
|
|
|
|
 Posting Rules
|
You may not post new threads
You may not post replies
You may not post attachments
You may not edit your posts
HTML code is Off
|
|
|
|
 Recent Discussions
 |
|
|
|
|
|
|
|
|
|
|
|
|
|
|
|
|
|
|
|
|
|
|
|
|
|
|
|
|
|
|
|
|
|