 |
|
 17 July 2020, 08:43
|
#1
|
|
Member
Country: UK - England
Town: Lancashire
Make: Osprey Eagle
Length: 6m +
Engine: Outboard
Join Date: Jun 2020
Posts: 18
|
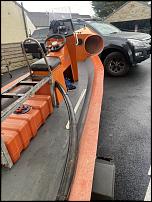
1988 Osprey eagle full refurb
__________________
|

|

|
 21 July 2020, 19:38
|
#2
|
|
Member
Country: UK - Wales
Town: Amlwch
Boat name: Gibraltar 1
Make: Osprey Eagle
Length: 5m +
Engine: Suzuki 100hp outboar
Join Date: Sep 2018
Posts: 48
|
As an eagle owner myself Iíll be following your progress , good luck
__________________
|

|

|
 21 July 2020, 21:08
|
#3
|
|
Member
Country: UK - Scotland
Town: Fort William
Make: Ribcraft 585
Length: 5m +
Engine: Yamaha F115
Join Date: Mar 2012
Posts: 2,928
|
Good luck with the work.
The tapes you are looking for are usually know as hull tapes or flange tapes.
https://www.ribworld.co.uk/hypalon-f...-145cm-x-15cm/
__________________
There is a place on this planet for all of Gods creatures.........right next to my tatties and gravy.
|

|

|
 22 July 2020, 07:19
|
#4
|
|
Member
Country: UK - England
Town: Lancashire
Make: Osprey Eagle
Length: 6m +
Engine: Outboard
Join Date: Jun 2020
Posts: 18
|
Thanks [emoji1317]
The tubes Iím putting on are polyurethane. Is it ok to fix with hypalon tape or would I have to use polyurethane tape? Hypalon would be easier to use I think due to it being a thinner material.
__________________
|

|

|
 22 July 2020, 07:21
|
#5
|
|
Member
Country: UK - England
Town: Lancashire
Make: Osprey Eagle
Length: 6m +
Engine: Outboard
Join Date: Jun 2020
Posts: 18
|
Also Iím not sure exactly which year this boat is. From reading the forums it seems like a 1991 boat but on the end of the tube when I removed it it was signed and dated 1988[emoji848]
__________________
|

|

|
 22 July 2020, 15:22
|
#6
|
|
Member
Country: UK - England
Town: Godalming
Boat name: Bumblebee
Make: Avon
Length: 4m +
Engine: yamaha 40hp 2stroke
Join Date: Oct 2017
Posts: 151
|
You should use PU tape ideally but hypalon might work. I'm no expert I'm following because I'm interested in doing the same sort of thing to my rib
__________________
|

|

|
 22 July 2020, 16:27
|
#7
|
|
Member
Country: UK - England
Town: Lancashire
Make: Osprey Eagle
Length: 6m +
Engine: Outboard
Join Date: Jun 2020
Posts: 18
|
Yep your probably right. Stick with the same material.
__________________
|

|

|
 22 July 2020, 16:30
|
#8
|
|
Member
Country: UK - England
Town: Lancashire
Make: Osprey Eagle
Length: 6m +
Engine: Outboard
Join Date: Jun 2020
Posts: 18
|
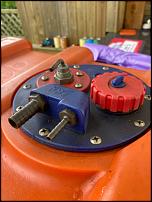
Donít suppose you know what the connections are for on the fuel tank? 
Iíve acquired an 80ltr tank which Iím going to build in under the 2 seater jockey seat.
__________________
|

|

|
 22 July 2020, 16:44
|
#9
|
|
Member
Country: UK - England
Town: Godalming
Boat name: Bumblebee
Make: Avon
Length: 4m +
Engine: yamaha 40hp 2stroke
Join Date: Oct 2017
Posts: 151
|
Yeah there's a fill port, drain port, vent and access. The vent looks like the standard 5 hole sender location too. The big hose barb is fill, small is drain to engine and the little one shaped like an l is the air vent
__________________
|

|

|
 22 July 2020, 17:19
|
#10
|
|
Member
Country: UK - England
Town: Godalming
Boat name: Bumblebee
Make: Avon
Length: 4m +
Engine: yamaha 40hp 2stroke
Join Date: Oct 2017
Posts: 151
|
.....
__________________
|

|

|
 28 July 2020, 09:19
|
#11
|
|
Member
Country: UK - England
Town: Lancashire
Make: Osprey Eagle
Length: 6m +
Engine: Outboard
Join Date: Jun 2020
Posts: 18
|
Floor sanded and non slip paint down, fuel tank ready to be installed under rear jockey seat 
__________________
|

|

|
 28 July 2020, 10:15
|
#12
|
|
Member
Country: UK - England
Town: Chesterfield
Boat name: Sea Quell
Make: Picton Cobra
Length: 5m +
Engine: Mercury 150 4 Stroke
MMSI: 235038298
Join Date: Sep 2003
Posts: 1,095
|
Quote:
Originally Posted by Livid

Yeah there's a fill port, drain port, vent and access. The vent looks like the standard 5 hole sender location too. The big hose barb is fill, small is drain to engine and the little one shaped like an l is the air vent
|
I am not sure you are right ,,, the fill is via the large threaded cap which also has a vent bleed screw on top. You can buy an adaptor to make it a remote fill by adding a 2" pipe and filler cap. The other port may have been adapted to make it a vent ,, but was originally for a fuel sender
I think the 2 take off points were to enable the tank to be used for a diesel system which needed a return flow pipe as well as take off. (the large bore one I think) In a petrol application this is normally blanked off.
Be careful not to overtighten the screws that hold the plates as they are easily stripped !!
Of course, as often, I could be wrong [emoji6]
__________________
|

|

|
 28 July 2020, 11:32
|
#13
|
|
Member
Country: UK - England
Town: Chesterfield
Boat name: Sea Quell
Make: Picton Cobra
Length: 5m +
Engine: Mercury 150 4 Stroke
MMSI: 235038298
Join Date: Sep 2003
Posts: 1,095
|
Quote:
Originally Posted by Jeff

I am not sure you are right ,,, the fill is via the large threaded cap which also has a vent bleed screw on top. You can buy an adaptor to make it a remote fill by adding a 2" pipe and filler cap. The other port may have been adapted to make it a vent ,, but was originally for a fuel sender
I think the 2 take off points were to enable the tank to be used for a diesel system which needed a return flow pipe as well as take off. (the large bore one I think) In a petrol application this is normally blanked off.
Be careful not to overtighten the screws that hold the plates as they are easily stripped !!
Of course, as often, I could be wrong [emoji6]
|
I was ....partly .... here is a site with the details. The fill kit can be bought separately if needed ( somewhere at least) https://www.marinescene.co.uk/view/1...der-amp;-gauge
__________________
|

|

|
 28 July 2020, 11:34
|
#14
|
|
Member
Country: UK - England
Town: Chesterfield
Boat name: Sea Quell
Make: Picton Cobra
Length: 5m +
Engine: Mercury 150 4 Stroke
MMSI: 235038298
Join Date: Sep 2003
Posts: 1,095
|
Quote:
Originally Posted by Jeff

I am not sure you are right ,,, the fill is via the large threaded cap which also has a vent bleed screw on top. You can buy an adaptor to make it a remote fill by adding a 2" pipe and filler cap. The other port may have been adapted to make it a vent ,, but was originally for a fuel sender
I think the 2 take off points were to enable the tank to be used for a diesel system which needed a return flow pipe as well as take off. (the large bore one I think) In a petrol application this is normally blanked off.
Be careful not to overtighten the screws that hold the plates as they are easily stripped !!
Of course, as often, I could be wrong [emoji6]
|
I was ....partly .... here is a site with the details. The fill kit can be bought separately if needed ( somewhere at least) https://www.marinescene.co.uk/view/1...der-amp;-gauge
.... here >> https://www.marinescene.co.uk/produc...SABEgLuTvD_BwE
__________________
|

|

|
 28 July 2020, 12:43
|
#15
|
|
Member
Country: UK - England
Town: Lancashire
Make: Osprey Eagle
Length: 6m +
Engine: Outboard
Join Date: Jun 2020
Posts: 18
|
Perfect. Thanks [emoji1303]
__________________
|

|

|
 28 July 2020, 12:45
|
#16
|
|
Member
Country: UK - England
Town: Lancashire
Make: Osprey Eagle
Length: 6m +
Engine: Outboard
Join Date: Jun 2020
Posts: 18
|
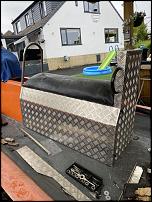
Jockey seat made of aluminium checker with removable side. Love the look. 
__________________
|

|

|
 28 July 2020, 19:29
|
#17
|
|
Member
Country: UK - England
Town: Godalming
Boat name: Bumblebee
Make: Avon
Length: 4m +
Engine: yamaha 40hp 2stroke
Join Date: Oct 2017
Posts: 151
|
Quote:
Originally Posted by Jeff

I am not sure you are right ,,, the fill is via the large threaded cap which also has a vent bleed screw on top. You can buy an adaptor to make it a remote fill by adding a 2" pipe and filler cap. The other port may have been adapted to make it a vent ,, but was originally for a fuel sender
I think the 2 take off points were to enable the tank to be used for a diesel system which needed a return flow pipe as well as take off. (the large bore one I think) In a petrol application this is normally blanked off.
Be careful not to overtighten the screws that hold the plates as they are easily stripped !!
Of course, as often, I could be wrong [emoji6]
|
Ah I see it now, I thought the holes were bigger, makes sense I guess, although I'm daft enough to try filling it through that vent line anyway  
__________________
|

|

|
 28 July 2020, 21:44
|
#18
|
|
Member
Country: UK - Channel Islands
Town: Jersey
Boat name: Jazcabel
Make: Ballistic
Length: 7m +
Engine: Petrol 150
Join Date: May 2017
Posts: 354
|
The big screw one is for the filler. The kit you buy can take both 38mm and 50mm filler hose and can either be a straight fit or a 90 degree. The 5 hole one next to it is the fuel sender.
Again you can buy a 5 hole Screw down or a single large screw in sender with the adaptor. The two front ones are pick up and breather. Pick up is either 5/16ths or 3/8ths. (8 or 10mm) and the larger dia one is the vent (16 or 19mm.)
Same as mine. Hope this helps
__________________
|

|

|
 28 July 2020, 21:52
|
#19
|
|
Member
Country: UK - Scotland
Town: Fort William
Make: Ribcraft 585
Length: 5m +
Engine: Yamaha F115
Join Date: Mar 2012
Posts: 2,928
|
I never got why a breather needs to be that size, it’s a nightmare trying to make a 19mm hose look tidy in a console.
__________________
There is a place on this planet for all of Gods creatures.........right next to my tatties and gravy.
|

|

|
 28 July 2020, 22:05
|
#20
|
|
Member
Country: UK - England
Town: Lancashire
Make: Osprey Eagle
Length: 6m +
Engine: Outboard
Join Date: Jun 2020
Posts: 18
|
Quote:
Originally Posted by Chanchan168

The big screw one is for the filler. The kit you buy can take both 38mm and 50mm filler hose and can either be a straight fit or a 90 degree. The 5 hole one next to it is the fuel sender.
Again you can buy a 5 hole Screw down or a single large screw in sender with the adaptor. The two front ones are pick up and breather. Pick up is either 5/16ths or 3/8ths. (8 or 10mm) and the larger dia one is the vent (16 or 19mm.)
Same as mine. Hope this helps
|
Where would be the best place to send the breather?
I am going to fit a grid vent in the back of the seat to prevent any build up of fumes inside the area around the tank.
__________________
|

|

|
 |
|
 Posting Rules
|
You may not post new threads
You may not post replies
You may not post attachments
You may not edit your posts
HTML code is Off
|
|
|
|
 Recent Discussions
 |
|
|
|
|
|
|
|
|
|
|
|
|
|
|
|
|
|
|
|
|
|
|
|
|
|
|
|
|
|
|
|
|
|