Reply
 
Thread Tools Search this Thread
 
Old 21 August 2015, 13:57   #21
Member
 
ribraff's Avatar
 
Country: UK - England
Town: Dartmouth
Length: 6m +
Join Date: Feb 2003
Posts: 1,220
Click image for larger version

Name:	ImageUploadedByRIB Net1440161728.594412.jpg
Views:	361
Size:	102.0 KB
ID:	108067Click image for larger version

Name:	ImageUploadedByRIB Net1440161746.712718.jpg
Views:	331
Size:	282.7 KB
ID:	108068
This is one I did a while back, two complete pieces of 18mm ply bonded together with a piece of the rear deck replaced so the the knees are glassed in all the way down to the inside of the hull.
__________________
Hypalon Tubes built in-house,retubing, repairs, Accessories
www.ribtube.co.uk
ribraff is offline   Reply With Quote
Old 21 August 2015, 13:58   #22
Member
 
1eyedjim's Avatar
 
Country: UK - England
Town: Birmingham
Boat name: Sparrowhawk
Make: Osprey
Length: 5m +
Engine: Yamaha 90hp 2T
Join Date: Apr 2010
Posts: 215
Surely the transom doesn't go all the way to the keel as the thru hull hole depth is not the thickness of the transom so must finish higher.

That picture looks like he is blocking the they hull off which is why it goes so low

I have a pic of my transom in my Sparrowhawk and this doesn't go to the keel either

Click image for larger version

Name:	ImageUploadedByRIB Net1440161899.384540.jpg
Views:	252
Size:	57.5 KB
ID:	108069
__________________
1eyedjim is offline   Reply With Quote
Old 27 August 2015, 18:38   #23
Member
 
Country: UK - England
Town: Poole
Boat name: skylark
Make: ribcraft
Length: 6m +
Engine: suzuki 140 4stroke
Join Date: Mar 2005
Posts: 21
right ply is epoxied in, seems strong and without the glass on it does flex a little if you lean back really hard on it.

now to glass it with roving and epoxy but before i do....
with 18mm ply and a few layers of glass it will be as standard
should i laminate another 18mm ply in to the existing and to the floor? this will mean removing the rubber tube attachments and moving them down the tubes 18mm also the support tubes will be a bit higher unless i notch them in to the first sheet.

or shall i leave as standard layer the 18mm up with the glass and put a stainless cover over the top for rigidity
i have a 40hp 4stroke honda 95kg LShaft going on.

Advice much appreciated

Andy
__________________
andyace is offline   Reply With Quote
Old 27 August 2015, 20:24   #24
Member
 
gtflash's Avatar
 
Country: UK - England
Town: southampton
Boat name: TOP CAT 2
Make: Scorpion 8.1
Length: 8m +
Engine: 250hp HO
Join Date: Aug 2003
Posts: 1,827
Not sure about the other bits, but if you are using epoxy, rovings are not the most ideal fabric. They are very heavy on resin, which is expensive when it is epoxy. If I use rovings I reckon I use 3 times the resin I do with bi axial cloth. Bi axial is far superior and stronger as the glass is not bent like woven rovings are because it is stitched instead. If you use epoxy which is my preference just use bi axial 45deg fabric. My transom had a total of 6 layers of alternating direction 450g on inside face plus the tabing but that was for a 250hp, and built to same thickness. Only mild issue is bi axial isn't great in corners so needs a fillet of filler at corners.

Also don't use csm with epoxy. Equally a waste of resin and not needed as the superior epoxy resin causes the inter layered bond (for want of a better word).

ps I am no expert


Quote:
Originally Posted by andyace View Post
right ply is epoxied in, seems strong and without the glass on it does flex a little if you lean back really hard on it.

now to glass it with roving and epoxy but before i do....
with 18mm ply and a few layers of glass it will be as standard
should i laminate another 18mm ply in to the existing and to the floor? this will mean removing the rubber tube attachments and moving them down the tubes 18mm also the support tubes will be a bit higher unless i notch them in to the first sheet.

or shall i leave as standard layer the 18mm up with the glass and put a stainless cover over the top for rigidity
i have a 40hp 4stroke honda 95kg LShaft going on.

Advice much appreciated

Andy
__________________
gtflash is offline   Reply With Quote
Old 27 August 2015, 21:22   #25
Member
 
Country: UK - Scotland
Boat name: Neptune
Make: Concorde
Length: 6m +
Engine: Mercury 150 V6
MMSI: 235103209
Join Date: Jan 2014
Posts: 36
I used 300 gsm bi axial underneath as it goes found corners, then 600 on top. No expert either! The biaxial matting distorts like crazy once you cut it so my top tip is make sure you mark all the key points on the cloth get them in the right place then then squidge the rest of it flat once it's on it has a lot of adjustment
__________________
mdearman is offline   Reply With Quote
Old 28 August 2015, 08:26   #26
Member
 
Country: UK - England
Town: Poole
Boat name: skylark
Make: ribcraft
Length: 6m +
Engine: suzuki 140 4stroke
Join Date: Mar 2005
Posts: 21
Thanks for that
will get some biaxial today and do it over the weekend
might even get her back in the water before summer starts......
Andy
__________________
andyace is offline   Reply With Quote
Old 28 August 2015, 08:32   #27
Member
 
Country: UK - Scotland
Boat name: Neptune
Make: Concorde
Length: 6m +
Engine: Mercury 150 V6
MMSI: 235103209
Join Date: Jan 2014
Posts: 36
That's what I thought, this time last year....
__________________
mdearman is offline   Reply With Quote
Old 28 August 2015, 12:28   #28
Member
 
gtflash's Avatar
 
Country: UK - England
Town: southampton
Boat name: TOP CAT 2
Make: Scorpion 8.1
Length: 8m +
Engine: 250hp HO
Join Date: Aug 2003
Posts: 1,827
Quote:
Originally Posted by mdearman View Post
That's what I thought, this time last year....
Mines 2 years
__________________
gtflash is offline   Reply With Quote
Old 10 September 2015, 11:43   #29
Member
 
Country: UK - England
Town: Poole
Boat name: skylark
Make: ribcraft
Length: 6m +
Engine: suzuki 140 4stroke
Join Date: Mar 2005
Posts: 21
Finished the Transom Rebuild!!!

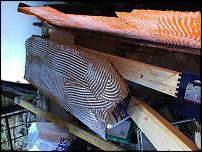
Wet the ply with epoxy, then with thickened epoxy spread with a grout spreader all over. used slow hardener with the epoxy.
Click image for larger version

Name:	IMG_0064.jpg
Views:	334
Size:	180.3 KB
ID:	108542

Clamped and left for 48 hours. with 2 m12 bolts through where the engine will bolt on.
then beat off the 4b2 with a lump hammer (mental note use wax paper between if you ever do this again...)
Click image for larger version

Name:	IMG_0066.jpg
Views:	292
Size:	125.3 KB
ID:	108543

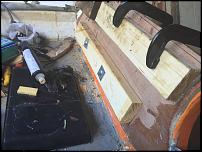
8 layers of 300g woven roving, 1 2 then 3 inches into the deck over the top and all the way down to the keel on the back, fast hardening epoxy (20 minutes laying up time) left for 4 days to go off.
Click image for larger version

Name:	IMG_0068.jpg
Views:	328
Size:	127.5 KB
ID:	108544

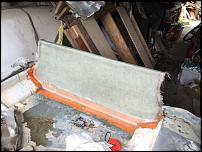
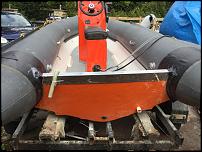
2mm thick 90cm wide 3" deep with internal gap of 1 1/4 inch stainless cap, engine top mount and struts bolted through with m12 bolts
Click image for larger version

Name:	IMG_0120.jpg
Views:	323
Size:	155.5 KB
ID:	108545

mounted the engine

Click image for larger version

Name:	IMG_0122.jpg
Views:	286
Size:	181.5 KB
ID:	108546

have now had 2 hours bumping around in chop to no ill effect,

thanks to all those who offered advice, cost me £150 saved me £600.
__________________
andyace is offline   Reply With Quote
Old 10 September 2015, 12:43   #30
Member
 
gtflash's Avatar
 
Country: UK - England
Town: southampton
Boat name: TOP CAT 2
Make: Scorpion 8.1
Length: 8m +
Engine: 250hp HO
Join Date: Aug 2003
Posts: 1,827
Quote:
Originally Posted by andyace View Post
Finished the Transom Rebuild!!!

Wet the ply with epoxy, then with thickened epoxy spread with a grout spreader all over. used slow hardener with the epoxy.

Attachment 108542

Clamped and left for 48 hours. with 2 m12 bolts through where the engine will bolt on.
then beat off the 4b2 with a lump hammer (mental note use wax paper between if you ever do this again...)

Attachment 108543

8 layers of 300g woven roving, 1 2 then 3 inches into the deck over the top and all the way down to the keel on the back, fast hardening epoxy (20 minutes laying up time) left for 4 days to go off.

Attachment 108544

2mm thick 90cm wide 3" deep with internal gap of 1 1/4 inch stainless cap, engine top mount and struts bolted through with m12 bolts

Attachment 108545

mounted the engine

Attachment 108546

have now had 2 hours bumping around in chop to no ill effect,

thanks to all those who offered advice, cost me £150 saved me £600.

Good job. Well done.
__________________
gtflash is offline   Reply With Quote
Old 10 September 2015, 12:51   #31
Member
 
Country: UK - England
Boat name: Son of a Beach
Make: Avon SR4
Length: 4m +
Engine: Mercury 50hp
Join Date: Sep 2012
Posts: 130
Looks tidy.
__________________
Tim in Yorkshire is offline   Reply With Quote
Reply


Posting Rules
You may not post new threads
You may not post replies
You may not post attachments
You may not edit your posts

BB code is On
Smilies are On
[IMG] code is On
HTML code is Off
Trackbacks are Off
Pingbacks are Off
Refbacks are Off


All times are GMT. The time now is 11:38.


Powered by vBulletin® Version 3.8.8 Beta 1
Copyright ©2000 - 2025, vBulletin Solutions, Inc.