|
|
 07 February 2024, 12:41
|
#21
|
|
Member
Country: UK - England
Town: Cheltenham
Make: Marex
Length: 9m +
Join Date: Oct 2011
Posts: 351
|
as you suggest, it maybe fine, personally I'd have gone a couple of cm's to starboard - maybe wait to fix batteries etc as a little extra weight on the starboard side my offset any lean. Either way I think loading will have a far greater impact than the prop.
__________________
You Can't cross an Ocean unless you have lost site of shore.
|

|

|
|
07 February 2024, 13:16
|
#22
|
|
Member
Country: UK - England
Town: Colchester
Length: 5m +
Join Date: Sep 2016
Posts: 3,124
|
Quote:
Originally Posted by charliee

as you suggest, it maybe fine, personally I'd have gone a couple of cm's to starboard - maybe wait to fix batteries etc as a little extra weight on the starboard side my offset any lean. Either way I think loading will have a far greater impact than the prop.
|
I agree. If I had offset it even the amount you suggest it would have had issues with the rear seat backrest when tilted up and some other issues. My 4.5 with a 60 is central and that is just fine. Also as you say you can do a little with the battery, loading and the trim tab at the bottom of the outboard.
As I said it was a decision and I went with straight in the grove 
__________________
|
|
|
|
|
10 February 2024, 14:42
|
#23
|
|
Member
Country: UK - England
Town: Cornwall
Boat name: Matchless
Make: Ribcraft 6.8m
Length: 6m +
Engine: Mercury 3.4l 225 V6
MMSI: 232028056
Join Date: Apr 2017
Posts: 287
|
Nice vids - know Simon well glad everything went well with the delivery 👍👍
__________________
|
|
|
|
|
10 February 2024, 16:38
|
#24
|
|
Member
Country: UK - England
Town: Colchester
Length: 5m +
Join Date: Sep 2016
Posts: 3,124
|
Quote:
Originally Posted by RickW
Nice vids - know Simon well glad everything went well with the delivery 👍👍
|
Thanks. Yes he drove a massive drive from Cornwall to Suffolk (Ipswich area) Had 3 Drop offs and then I think drove home.
We are making decent steady progress with the Rib and there will be another short video soon. It is surprising how much is dependant on other things.
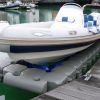
It has all been determined by fitting the rear seat in and the tilt of the engine. I Could not get full tilt but it goes far enough. I fashioned a transom saver tilt support from a £6.50 trailer roller to go over the ram for towing as I cant get it high enough to go on the tilt locks. Here are a few pics. It seem to work well
__________________
|
|
|
|
|
11 February 2024, 09:05
|
#25
|
|
Member
Country: UK - England
Town: Colchester
Length: 5m +
Join Date: Sep 2016
Posts: 3,124
|
So as not to feel overwhelmed and keep waking up in the night thinking of my list of jobs in this build I have made a list. There is still stuff to add but this is a first attempt that might help others
__________________
|
|
|
|
|
11 February 2024, 14:12
|
#26
|
|
Member
Country: UK - England
Town: Colchester
Length: 5m +
Join Date: Sep 2016
Posts: 3,124
|
Well the Amazon has not arrived yet with my 4.2 mm drill bits for the floor fixings so been doing some small jobs. One of which is making the floating key fobs from old Korks. We have decided on a name for the Boat. As my other Rib is called Click and Collect and my 17 Foot Fletcher is Add to Cart. Me and Her indoors decided to name this Rib 'Buy it Now'
__________________
|
|
|
|
|
11 February 2024, 14:55
|
#27
|
|
Member
Country: UK - England
Town: Colchester
Length: 5m +
Join Date: Sep 2016
Posts: 3,124
|
Did some small Random jobs today on the Xpro 535 while waiting on Amazon. All moves the job forward. Here is a little video of todays progress
__________________
|
|
|
|
|
12 February 2024, 17:10
|
#28
|
|
Member
Country: UK - England
Town: Colchester
Length: 5m +
Join Date: Sep 2016
Posts: 3,124
|
Pleased to say we made more progress today and got the Back seats and seatback fitted and a few other jobs. Like so many things it takes rather longer than you expect. Still moving forward. It was a tight squeeze re the outboard tilt but it worked ok in the end.
Here is a little video of our days work
__________________
|
|
|
|
|
14 February 2024, 17:48
|
#29
|
|
Member
Country: UK - England
Town: Colchester
Length: 5m +
Join Date: Sep 2016
Posts: 3,124
|
Did some more on the Xpro 535 today and Yesterday. Heck I havenever seen such a thick fascia to a console. Here is a little video of the latest work carried out.
I am quite enjoying this build
__________________
|
|
|
|
|
16 February 2024, 19:47
|
#30
|
|
Member
Country: UK - England
Town: Colchester
Length: 5m +
Join Date: Sep 2016
Posts: 3,124
|
More work on the Rib in the last couple of days. Getting so things fitted to help her indoors. Soon the console and drivers seat can go in and then we will be getting there sort of
__________________
|
|
|
|
|
17 February 2024, 11:53
|
#31
|
|
Member
Country: UK - England
Town: Colchester
Length: 5m +
Join Date: Sep 2016
Posts: 3,124
|
Been wiring up the Console today. This is quite nice to do on your own rib because you know what all the wires do and can make good connections and can create your own birds nest that you can understand lol
__________________
|
|
|
|
|
17 February 2024, 13:58
|
#32
|
|
Member
Country: UK - England
Town: Colchester
Length: 5m +
Join Date: Sep 2016
Posts: 3,124
|
Here is an example of the sort of wires I have been making up. This is for the bilge Pump. The round connector goes to the common earth block and the red positive connector will go into the Blue Sea Switch panel
__________________
|
|
|
|
|
17 February 2024, 18:59
|
#33
|
|
Member
Country: UK - England
Length: 3m +
Join Date: Sep 2008
Posts: 2,767
|
I usually try to stagger my +/- connectors so that if they are loose for any reason they can't touch and short.
__________________
|
|
|
|
|
17 February 2024, 20:04
|
#34
|
|
Member
Country: UK - England
Town: Colchester
Length: 5m +
Join Date: Sep 2016
Posts: 3,124
|
I have a single Negative block and the switch panel I am using has in effect only one Positive feed and then the individual connectors.
I am also 3D printing a cover for the negative block so that should not happen.
I have also soldered all connectors.
__________________
|
|
|
|
|
18 February 2024, 06:50
|
#35
|
|
Member
Country: UK - England
Town: Colchester
Length: 5m +
Join Date: Sep 2016
Posts: 3,124
|
As the weather is pants at the moment I decided to have another little play with the 3D Printer and made a backing box for the large battery isolator switch
__________________
|
|
|
|
|
19 February 2024, 17:03
|
#36
|
|
Member
Country: UK - England
Town: Colchester
Length: 5m +
Join Date: Sep 2016
Posts: 3,124
|
Did some small jobs today. Mounted the batter switch and drilled and made an outlet in the leaning seat for the cables to exit. Also designed and printed some more little 3d items for the electrics as covers on the rear of the console fascia. Little video coming in due course 
__________________
|
|
|
|
|
21 February 2024, 18:06
|
#37
|
|
Member
Country: UK - England
Town: Colchester
Length: 5m +
Join Date: Sep 2016
Posts: 3,124
|
Here is the next video in the series. I feel like we are getting along quite nicely. The best thing I di was to put all the stuff in and on the console and leaning post out of the boat. It has made it so much easier
__________________
|
|
|
|
|
22 February 2024, 16:48
|
#38
|
|
Member
Country: UK - England
Town: Colchester
Length: 5m +
Join Date: Sep 2016
Posts: 3,124
|
Slowly but surely getting through the list of Jobs building this XPro 535 From 3D Tender.
Had some joy today tested all the installed stuff in the console and pleased to say it all worked.
Here is an updated list of where I am at for those that are interested
__________________
|
|
|
|
|
24 February 2024, 20:34
|
#39
|
|
Member
Country: UK - England
Town: Colchester
Length: 5m +
Join Date: Sep 2016
Posts: 3,124
|
Moved the boat forward a little more. We recon we are about 70 % complete now and tomorrow we will be putting the console and seat in the boat. Little video below of recent progress
__________________
|
|
|
|
|
25 February 2024, 11:29
|
#40
|
|
Member
Country: UK - England
Town: Colchester
Length: 5m +
Join Date: Sep 2016
Posts: 3,124
|
Today we have put the console and leaning seat in to see how it fits and set there position. We hare very happy with how it fits and it feels comfortable and looks right we feel. We will not fix it down today but will sleep on it overnight and think it over and fix it with a few screws on Monday or Tuesday. Then I will measure and order the Ultraflex cable and fight that in lol
Pics below of the layout and how it fits. The pieces of wood are just measure spacers to get it square
__________________
|
|
|
|
|
|
 Posting Rules
|
You may not post new threads
You may not post replies
You may not post attachments
You may not edit your posts
HTML code is Off
|
|
|
|
 Recent Discussions
 |
|
|
|
|
|
|
|
|
|
|
|
|
|
|
|
|
|
|
|
|
|
|
|
|
|
|
|
|
|
|
|
|
|


 Mavi Su
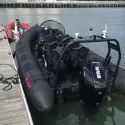 Matchless