 |
 07 March 2014, 00:36
|
#1
|
|
Member
Country: UK - England
Town: Dorset
Length: 6m +
Join Date: May 2013
Posts: 159
|
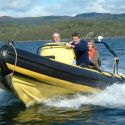
Humber Destroyer Winter Refurb
Hi all,
I have been a regular reader to all the great advice on this forum for a while and have gained a lot of knowledge (plus a few laughs, especially a certain "ski boat operator" down our way in South Wales!). After taking useful points from lots of other builds and fixes I thought it was time to give something back and hopefully someone else will be inspired or find something useful.
Our club dive RIB was looking extremely tired and things kept failing and requiring constant maintenance (mostly electrics). A few bodge jobs had been done in the past making diagnosing faults tricky. Add to this some shocking build quality from Humber out of the factory and after 13 years of use it was decided it was time for considerable improvements. In the past 2 months the following has been done:
- Steering helm unit replaced (old one jammed at high speeds!). The steering boss was seized on the shaft so had to be cut through. As you can see from the pictures the inside of the console was nasty and hadn't been sealed properly.
- Engine lock cut off - old one was seized and engine had been set up far too low by Humber. The lock did a superb job as it was a bugger to remove but the handling and speed improvements were drastic when the engine was moved up a hole.
- With 8 divers on boat the cut out in the transom meant it regularly flooded so I made up a piece of acrylic to partially cover the gap and give 3 inches of extra height. The difference is instantly noticeable - a dry boat!
More pictures and the more interesting stuff (incl LED trailer lights) to come shortly.
__________________
|

|

|
|
07 March 2014, 00:45
|
#2
|
|
Member
Country: UK - England
Town: Dorset
Length: 6m +
Join Date: May 2013
Posts: 159
|
As you can probably see from the state of the wiring in the pictures it was an absolute mess. Every single piece of wire except the engine loom came out and was replaced. A while back the previous caretakers of the boat had used poor quality, non waterproof connectors and in one case had just shoved the important electronics ground wires onto the tacho post with no connector! 
The battery was corroded (and undersized) so got the chop for a new Numax marine unit. However the engine was still sluggish to start. I later found out that Humber had fitted 16mm^2 cables for a 4m run when the manual says at least double that! New bigger cables fitted and all was well.
New LED nav lights and flood lights were fitted to the A frame and wired up to a custom made laser cut switch panel with a variety of carling switches. A Blue sea systems mini isolator switch was put in to replace the basic plastic key type originally installed.
__________________
|
|
|
|
|
07 March 2014, 00:46
|
#3
|
|
Member
Country: UK - England
Town: Dorset
Length: 6m +
Join Date: May 2013
Posts: 159
|
The before pic of the fuse box!
__________________
|
|
|
|
|
07 March 2014, 00:51
|
#4
|
|
Member
Country: UK - England
Town: Dorset
Length: 6m +
Join Date: May 2013
Posts: 159
|
End result could have been neater but a hell of a lot better than before. Proper heatshrink connectors and new cables run right from console to A frame (including many frustrating attempts to feed cable through conduit and a frame!).
__________________
|
|
|
|
|
07 March 2014, 01:01
|
#5
|
|
Member
Country: UK - England
Town: Dorset
Length: 6m +
Join Date: May 2013
Posts: 159
|
So now onto the trailer.
The boat was previously strapped to trailer with a ratchet strap over the tubes. It really annoyed me as it deformed the tubes, tension changed depending on temperature and allowed the boat to bounce. So on taking over looking after the boat I wanted to get rid of it. It could have been solved using a couple of basic straps but we decided the investment of a couple of boatbuckles would be worth it for the ease of use. A couple of holes in the trailer later and everything is much quicker and more secure.
Another pet hate was putting lightboards on and off all the time plus their inevitable failure at the worst moment. I therefore decided to make up two submersible LED units (thanks go to Nasher for the inspiration on this one). The parts were from LED autolamps but with an additional fog lamp added to the G2 system as its not there as standard. Load resistors were added to the junction box on the winch post. The lights were mounted on a laser cut backing and secured to the light arms with a welded bracket. This allows them to be extended for towing and retracted for launch and recovery. The time saved really adds up especially on a day trip.
__________________
|
|
|
|
|
07 March 2014, 01:05
|
#6
|
|
Member
Country: UK - England
Town: Dorset
Length: 6m +
Join Date: May 2013
Posts: 159
|
The final job was to do a proper wiring diagram to make any fault finding simple in the future.
Only remaining problem is the trim sender. The bolt has sheared on the old one and despite many different attempts to remove it I have had no luck. May have to resort to having a short piece of threaded rod welded on and using a nut to secure. Anyone got any good other ideas?
__________________
|
|
|
|
|
07 March 2014, 07:20
|
#7
|
|
Member
Country: UK - Wales
Town: N Wales Chester
Boat name: Mr Smith
Make: Humber
Length: 6m +
Join Date: Feb 2009
Posts: 5,238
|
Great colour! 
__________________
|
|
|
|
|
07 March 2014, 07:25
|
#8
|
|
Member
Country: UK - England
Town: liverpool
Make: tohatsu6.1 one desig
Length: 6m +
Engine: mariner 125hp
Join Date: Jan 2012
Posts: 357
|
Good job
Sometimes it's best to rip it all out and start from scratch. There are probably thousands of boats out there that have been chopped and changed lots of times over the years and could do with the same treatment. Is mine one? Not quite but not far off!
__________________
|
|
|
|
|
07 March 2014, 07:26
|
#9
|
|
Member
Country: UK - England
Town: liverpool
Make: tohatsu6.1 one desig
Length: 6m +
Engine: mariner 125hp
Join Date: Jan 2012
Posts: 357
|
Quote:
Originally Posted by HUMBER P4VWL

Great colour! |
Agree +1
__________________
|
|
|
|
|
07 March 2014, 07:28
|
#10
|
|
Member
Country: UK - England
Town: New Milton
Boat name: Jianna
Make: Osprey
Length: 6m +
Engine: 200 E-TEC
MMSI: 235076954
Join Date: Sep 2004
Posts: 1,940
|
I have personal experience and heard more than a few similar stories of dive club owned boats. Often the 'caretaker' changes regularly, if not annually, meaning that a constant maintenance regime is difficult to maintain.
Good work  but be careful you do not become a dedicated boat maintainer to the detriment of your diving
__________________
Ian
Dust creation specialist
|
|
|
|
|
07 March 2014, 07:56
|
#11
|
|
Member
Country: UK - Scotland
Town: Girvan & Tayvallich
Boat name: Breawatch
Make: Ribcraft
Length: 5m +
Engine: Mercury 150 F/stroke
MMSI: ex directory!!
Join Date: Sep 2008
Posts: 6,203
|
Great job well done. Would like more info on your acrylic piece for the cut out on stern as I have same problem. Tx
Sent from my iPhone using Rib.net
__________________
jambo
'Carpe Diem'
Member of the ebay Blue RIB cover club
Member of SABS ( Scottish West Division)
|
|
|
|
|
07 March 2014, 09:27
|
#12
|
|
Member
Country: Netherlands
Boat name: Scubaqua
Make: Humber Ocean Pro 6.3
Length: 6m +
Engine: Evinrude E-tec 115
MMSI: 244630361
Join Date: Oct 2013
Posts: 71
|
Nice done.
As far for the cut-out. Now your motor is higher on the transom?
You can't do that without accept the consequenses. The shaft length and cut out of the transom have to match.
Or have you changed the lengthof the shaft?
It's better to reduce water intake, by turning a corner before reducing speed. At least, that's what I do.... :-)
__________________
|
|
|
|
|
07 March 2014, 09:38
|
#13
|
|
Member
Country: UK - Wales
Town: N Wales Chester
Boat name: Mr Smith
Make: Humber
Length: 6m +
Join Date: Feb 2009
Posts: 5,238
|
Our waterline on the Humber OP is V good. Do you have a long shaft rather than XL, that may have meant a lower transom was needed. Plus 8 divers plus kit in a 6m (?) boat is a lot of weight, no wonder it would sit low.
Good work though, I like the idea if submersible lights.
__________________
|
|
|
|
|
07 March 2014, 09:46
|
#14
|
|
Member
Country: UK - England
Town: Beds/South coast
Make: Ribcraft 585
Length: 6m +
Engine: Yam 115
Join Date: Jul 2010
Posts: 294
|
Nice job you're doing there chap! I am in the same situation. Boat officer/caretaker/Instructor for our dive club. Trying to keep the boat in good condition all the time & not let people add their own little add-ons/repairs etc?
Not as clever as you though, I tend to get it professionally looked at if I think the repair is beyond my capabilities.
We installed aluminium plate to cover the top of transom preventing excess splashing while 6 divers are kitting up, also 2 auto bilge pumps help massively! Dry boat now, instead of always standing in a puddle!! lol. Look forward to seeing more pictures! Thanks!
__________________
|
|
|
|
|
07 March 2014, 10:16
|
#15
|
|
Member
Country: UK - England
Town: Dorset
Length: 6m +
Join Date: May 2013
Posts: 159
|
Quote:
Originally Posted by HUMBER P4VWL
Great colour! |
Indeed, we rather like it. Apparently it wasn't a standard Humber colour at the time as I have been trying to get the colour code of them for ages but they keep saying they need to check the paper archives.
__________________
|
|
|
|
|
07 March 2014, 10:20
|
#16
|
|
Member
Country: UK - England
Town: Dorset
Length: 6m +
Join Date: May 2013
Posts: 159
|
Quote:
Originally Posted by scubaqua
Nice done.
As far for the cut-out. Now your motor is higher on the transom?
You can't do that without accept the consequenses. The shaft length and cut out of the transom have to match.
Or have you changed the lengthof the shaft?
It's better to reduce water intake, by turning a corner before reducing speed. At least, that's what I do.... :-)
|
Engine shaft length hasn't been changed, the problem was that the cut out was too deep to start with so even when the engine was in its original position it sat a good inch or so above the cut out. Our pooping issue was only at rest while divers in kit were sat towards the stern. Even with 6 divers it was an issue. I temporarily patched it up with marine ply when the engine was a hole down and just an inch of extra transom height made a huge difference. Have been 8 miles offshore on a site with water round our knees. Not pleasant!
__________________
|
|
|
|
|
07 March 2014, 10:27
|
#17
|
|
Member
Country: UK - England
Town: Dorset
Length: 6m +
Join Date: May 2013
Posts: 159
|
Quote:
Originally Posted by jambo
Great job well done. Would like more info on your acrylic piece for the cut out on stern as I have same problem. Tx
Sent from my iPhone using Rib.net
|
All I did was knock up a cardboard template and ordered a 1000x250mm acrylic sheet from ebay. Plenty of sawing and filing later (as it was too big for the laser cutter) its not a perfect fit but does the job. Is held in place with the engine mounting bolts and sealed with silicone.
__________________
|
|
|
|
|
07 March 2014, 10:30
|
#18
|
|
Member
Country: UK - Scotland
Town: Girvan & Tayvallich
Boat name: Breawatch
Make: Ribcraft
Length: 5m +
Engine: Mercury 150 F/stroke
MMSI: ex directory!!
Join Date: Sep 2008
Posts: 6,203
|
Okay thanks 
Sent from my iPhone using Rib.net
__________________
jambo
'Carpe Diem'
Member of the ebay Blue RIB cover club
Member of SABS ( Scottish West Division)
|
|
|
|
|
 Posting Rules
|
You may not post new threads
You may not post replies
You may not post attachments
You may not edit your posts
HTML code is Off
|
|
|
|
 Recent Discussions
 |
|
|
|
|
|
|
|
|
|
|
|
|
|
|
|
|
|
|
|
|
|
|
|
|
|
|
|
|
|
|
|
|
|


 Breawatch
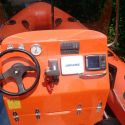 Scubaqua


