|
|
 23 February 2015, 04:39
|
#21
|
|
Member
Country: USA
Town: Mountain View, CA
Boat name: Six Park
Make: True Kit
Length: 3m +
Engine: Suzuki 6
Join Date: Dec 2014
Posts: 236
|
ncp, what should I look for inside the hole to know if it needs to be sealed with resin?
My boat comes with the shittiest manual of all and it doesn't even talk about engine mounting, much less about drilling holes.
The Suzuki motor comes with a decent owner's manual and I am also buying the service manual as well.
__________________
|

|

|
|
23 February 2015, 06:44
|
#22
|
|
Member
Country: USA
Town: NorCal
Boat name: SHARKY
Make: AB
Length: 4m +
Engine: Honda BF75 & BF5
Join Date: Dec 2009
Posts: 2,124
|
Quote:
Originally Posted by ba_fisher

The motor's manual says that the bottom of the boat should be within 0~25mm from the anti-cavitation plate. I am at 30mm. Should I worry too much about the 5mm?
|
Shim it up at least 10mm. You should be able to do that without cutting anything. You can make a permanent shim so should you desire.
Quote:
Originally Posted by ba_fisher
ncp, what should I look for inside the hole to know if it needs to be sealed with resin?
|
Wood? When you drill it you will know. Don't breathe the dust.
__________________
|
|
|
|
|
25 February 2015, 06:16
|
#23
|
|
Member
Country: USA
Town: Mountain View, CA
Boat name: Six Park
Make: True Kit
Length: 3m +
Engine: Suzuki 6
Join Date: Dec 2014
Posts: 236
|
Quote:
Originally Posted by Peter_C
Shim it up at least 10mm. You should be able to do that without cutting anything. You can make a permanent shim so should you desire.
|
I am thinking of using a strip of 3/4 inch starboard to shim it up. Will that work?
I've seen people shimming up their motors using plywood, so I figure that starboard will hold at least as well as plywood.
I found out today that I can lift the motor by myself, so I'll ask my kid to insert the shim while I hold the motor up.
__________________
|
|
|
|
|
25 February 2015, 06:24
|
#24
|
|
Member
Country: USA
Town: Mountain View, CA
Boat name: Six Park
Make: True Kit
Length: 3m +
Engine: Suzuki 6
Join Date: Dec 2014
Posts: 236
|
I asked Mercury about drilling on the floor, and they sent me this drawing with a note:
"Anywhere in the gray shaded areas will be suitable to drill without concern."
If you look closely, there are four weird horizontal bars within the gray area. Could those be some sort of beams underneath? That seems unlikely considering that this is such a small boat.
Anyway, I'll start a-drilling tomorrow and will find out with the help of a bent hanger.
__________________
|
|
|
|
|
27 February 2015, 06:56
|
#25
|
|
Member
Country: USA
Town: NorCal
Boat name: SHARKY
Make: AB
Length: 4m +
Engine: Honda BF75 & BF5
Join Date: Dec 2009
Posts: 2,124
|
Quote:
Originally Posted by ba_fisher
I am thinking of using a strip of 3/4 inch starboard to shim it up. Will that work?
I've seen people shimming up their motors using plywood, so I figure that starboard will hold at least as well as plywood.
I found out today that I can lift the motor by myself, so I'll ask my kid to insert the shim while I hold the motor up.
|
You can use most anything to shim it up. Really it is the bolts that hold it in place with the clamps too of course.
__________________
|
|
|
|
|
27 February 2015, 15:47
|
#26
|
|
Member
Country: USA
Town: S. Carolina
Boat name: D560
Make: Avon
Length: 5m +
Engine: 2016 Merc 115hp CT
Join Date: Aug 2013
Posts: 1,277
|
Quote:
Originally Posted by ba_fisher
The motor's manual says that the bottom of the boat should be within 0~25mm from the anti-cavitation plate. I am at 30mm. Should I worry too much about the 5mm?
|
You will produce 3/16" more drag than the manual recommends. The performance different will probably be negligible.
For aftermarket consoles, I've notched the side of them before to bring them closer to the tube. It really opens up the aisle a lot more, which is great when you've got divers with tanks. However, you'll have to make some brackets, since you'll be cutting away the mounting lip of the console.
As a tip too, we'd usually do Nauticus smart-tabs on all RIBs under 5 meters, especially if you're running a 6gal or 12gal at the stern of the vessel.
__________________
Richard
Gluing geek since 2007
Opinions and intepretations expressed are solely my own and do not express the views or opinions of my employer
|
|
|
|
|
06 March 2015, 03:34
|
#27
|
|
Member
Country: USA
Town: Mountain View, CA
Boat name: Six Park
Make: True Kit
Length: 3m +
Engine: Suzuki 6
Join Date: Dec 2014
Posts: 236
|
Drilled eight 1/2 inch holes today for mounting the cooler seat

It looks like the deck has wood inside, so I will seal the holes with epoxy resin first. Bought a Western System epoxy kit from west marine. Hopefully it will have enough resin for my purposes - I will have about 25 holes on the boat.
Earlier I also drilled a few small 'exploratory holes' to find out how much space I have under the deck. So I need to seal them with epoxy and fill with 3M 5200
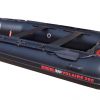
Here's the cooler seat

I'll mount it using these toggle bolts, as recommended by the owner of defender.com

They take 1/4 inch bolts. Hopefully will be enough for the seat.
__________________
|
|
|
|
|
06 March 2015, 03:35
|
#28
|
|
Member
Country: USA
Town: Mountain View, CA
Boat name: Six Park
Make: True Kit
Length: 3m +
Engine: Suzuki 6
Join Date: Dec 2014
Posts: 236
|
__________________
|
|
|
|
|
06 March 2015, 03:39
|
#29
|
|
Member
Country: USA
Town: Mountain View, CA
Boat name: Six Park
Make: True Kit
Length: 3m +
Engine: Suzuki 6
Join Date: Dec 2014
Posts: 236
|
I found the easiest way to drill on the deck is to use a small cobalt bit to drill a pilot hole, then use a frostner bit to scrape open the gelcoat until I hit the wood, then use a regular drill bit to finish the job. No need for blue tape to protect the gelcoat from cracking.
__________________
|
|
|
|
|
06 March 2015, 03:40
|
#30
|
|
Member
Country: USA
Town: Mountain View, CA
Boat name: Six Park
Make: True Kit
Length: 3m +
Engine: Suzuki 6
Join Date: Dec 2014
Posts: 236
|
Also bought a battery from west marine. Now I can raise the motor.

__________________
|
|
|
|
|
06 March 2015, 20:30
|
#31
|
|
Member
Country: USA
Town: California
Make: Avon 5.4m Searider
Length: 5m +
Engine: Yamaha 90
Join Date: Aug 2011
Posts: 1,261
|
This is one of drainage holes in my anchor lock. Some people will just us a q-tip and coat it, I chose to drill, fill, and re-drill.
__________________
|
|
|
|
|
07 March 2015, 05:43
|
#32
|
|
Member
Country: USA
Town: Mountain View, CA
Boat name: Six Park
Make: True Kit
Length: 3m +
Engine: Suzuki 6
Join Date: Dec 2014
Posts: 236
|
Quote:
Originally Posted by ncp
This is one of drainage holes in my anchor lock. Some people will just us a q-tip and coat it, I chose to drill, fill, and re-drill.
|
I have 20 holes on the deck for the console and the seat. And I don't have access to under the deck. So it's hard to fill the holes and redrill. I'll use qtip to coat them ..
I will drill 4 more holes on the transom. Those I will try to fill and redrill. Any suggestion on how to fill these vertical holes and also avoid bubbles in the epoxy?
__________________
|
|
|
|
|
07 March 2015, 12:28
|
#33
|
|
Member
Country: USA
Town: California
Make: Avon 5.4m Searider
Length: 5m +
Engine: Yamaha 90
Join Date: Aug 2011
Posts: 1,261
|
Quote:
Originally Posted by ba_fisher
I will drill 4 more holes on the transom. Those I will try to fill and redrill. Any suggestion on how to fill these vertical holes and also avoid bubbles in the epoxy?
|
Thicken the epoxy into a paste with cabosil. If you don't want to go buy some (and West Marine over charges), I've heard of people thickening with talcum powder.
__________________
|
|
|
|
|
09 March 2015, 02:32
|
#34
|
|
Member
Country: USA
Town: Mountain View, CA
Boat name: Six Park
Make: True Kit
Length: 3m +
Engine: Suzuki 6
Join Date: Dec 2014
Posts: 236
|
Drilled holes for the console. Added aluminum angles per advice of defender.com. Put everything together for a dry fit. Amazingly it fit the first time, thanks to my precision engineering method of cardboard templates. Tomorrow I'll add 3M 5200 to finish it.

To prevent corrosion between the aluminum angles and the stainless bolts, I added flanged nylon washers so there is no contact between different metals

Close up of the bolt and nylon washer

Added a rubber boot for the steering and battery cable to go through.
Plenty of space on front of the console.

__________________
|
|
|
|
|
09 March 2015, 02:33
|
#35
|
|
Member
Country: USA
Town: Mountain View, CA
Boat name: Six Park
Make: True Kit
Length: 3m +
Engine: Suzuki 6
Join Date: Dec 2014
Posts: 236
|
Rubber cable boot


__________________
|
|
|
|
|
09 March 2015, 02:40
|
#36
|
|
Member
Country: USA
Town: Mountain View, CA
Boat name: Six Park
Make: True Kit
Length: 3m +
Engine: Suzuki 6
Join Date: Dec 2014
Posts: 236
|
Here are the toggle bolts. I pared off the tips so that I can do the dry fitting

I haven't tightened the toggle bolts yet. Will tighten it at the final fitting after squirting lots of 5200 into the holes. I already q-tipped the holes with epoxy but it's probably too thin.

__________________
|
|
|
|
|
09 March 2015, 02:47
|
#37
|
|
Member
Country: USA
Town: Mountain View, CA
Boat name: Six Park
Make: True Kit
Length: 3m +
Engine: Suzuki 6
Join Date: Dec 2014
Posts: 236
|
Drilled four holes on the transom. It wasn't easy with the motor already there, and also no template from Suzuki. There might be a template, but it didn't come with the motor and I am too lazy to ask for one.

I decided to not raise the motor now. It will be slightly lower than the spec. I left enough space there so I can raise the motor by 3/4 inch later if the extra drag becomes an issue.

The hole on the transom is aligned with the 2nd lowest hole on the motor. I can raise the motor later by moving down to the lowest one.
__________________
|
|
|
|
|
09 March 2015, 02:53
|
#38
|
|
Member
Country: USA
Town: Mountain View, CA
Boat name: Six Park
Make: True Kit
Length: 3m +
Engine: Suzuki 6
Join Date: Dec 2014
Posts: 236
|
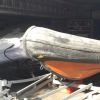
The cooler seat's base is too wide for my deck, so I removed it and build a new base using starboard.
Hollowed out the middle to save some weight.

Counter-sunk the holes with a frostner bit to allow space for the bolt heads.
__________________
|
|
|
|
|
09 March 2015, 02:54
|
#39
|
|
Member
Country: USA
Town: Mountain View, CA
Boat name: Six Park
Make: True Kit
Length: 3m +
Engine: Suzuki 6
Join Date: Dec 2014
Posts: 236
|
__________________
|
|
|
|
|
10 March 2015, 01:08
|
#40
|
|
Member
Country: USA
Town: San Francisco Bay
Boat name: SRMN 600
Make: Zodiac
Length: 6m +
Engine: Honda 90
Join Date: Mar 2013
Posts: 478
|
Great progress so far! Any idea on where to mount the vhf ant?
__________________
|
|
|
|
|
|
 Posting Rules
|
You may not post new threads
You may not post replies
You may not post attachments
You may not edit your posts
HTML code is Off
|
|
|
|
 Recent Discussions
 |
|
|
|
|
|
|
|
|
|
|
|
|
|
|
|
|
|
|
|
|
|
|
|
|
|
|
|
|
|
|
|
|
|