Go Back   RIBnet Forums > RIB talk > RIBs & ribbing
Click Here to Login

Reply
 
Thread Tools Search this Thread
 
Old 09 July 2024, 11:45   #1
Member
 
Country: Sweden
Length: 6m +
Join Date: Jul 2024
Posts: 1
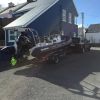
Tubes detached from stern/transom

Hi,


The strip that holds the tubes to the hull has ripped on both starboard and port sides in the aft. There are a lot of old repair patches and glue, some better and some worse. I think it's best to leave the old patches on, just round the loose, pointy corners and glue them back, since they seem to be firmly attached otherwise.


How would you fix this? I'm thinking about two ways to approach it, see the last picture.


1. Put a single patch to cover the whole area (blue). Problem: there is a little bit of difference in height between 'sternum to tube' and ' "lengthways" to tube' which might result in a bubble at the corner because it could be hard to press the two layers completely tight.


2. To first put on the red strip and on top put the green. This seems not really good either because it leaves the corner more fragile and water can also get in between the hull and tubes.


The aft corners seems to be the most vulnerable place of the tube attachment. Is this a common problem? I tried to find images of how tubes are originally attached on RIBs, but can't find what it looks like from underneath.


Thanks!
Attached Thumbnails
Click image for larger version

Name:	20240708_181441.jpg
Views:	38
Size:	101.9 KB
ID:	145433   Click image for larger version

Name:	20240708_181549.jpg
Views:	38
Size:	117.3 KB
ID:	145435   Click image for larger version

Name:	Screenshot_20240709_134137_Gallery.jpg
Views:	39
Size:	137.0 KB
ID:	145443   Click image for larger version

Name:	20240709_130401.jpg
Views:	36
Size:	157.3 KB
ID:	145444  
__________________
Invasive is offline   Reply With Quote
Old 09 July 2024, 23:52   #2
Member
 
Peter_C's Avatar
 
Country: USA
Town: NorCal
Boat name: SHARKY
Make: AB
Length: 4m +
Engine: Honda BF75 & BF5
Join Date: Dec 2009
Posts: 2,053
Remove all the tabing, clean off the old glue with scuffy pad and acetone, scuff the surface, and re-glue it with a 2 part glue. It's a lot of work. Get to it!

There is far more to doing the job though. Are you going to farm it out or DIY?
__________________
Peter_C is offline   Reply With Quote
Old 10 July 2024, 07:43   #3
Member
 
Country: UK - England
Town: Brum
Boat name: UTV
Make: Bombard Aerotec
Length: 3m +
Engine: 2 stroke 25hp
MMSI: 235933026
Join Date: May 2003
Posts: 715
Use a heat gun to remove the old patches and label and photograph them as the come off, it's easy to get mixed up........
__________________
tinker is offline   Reply With Quote
Old 10 July 2024, 10:04   #4
Member
 
User name's Avatar
 
Country: Ireland
Boat name: 380S
Make: Yamaha
Length: 3m +
Engine: Honda BF15
Join Date: Jun 2023
Posts: 399
I'd agree with the guys above. Remove all old junk.

The green example in your diagram would be prone to tearing at that inner corner again. I'd go with a rounded or L-shaped patch to spread across the corner and then maybe your larger (blue line) patch over the top. You'll want to make sure the back side is well bonded to the hull too. That part will be a bit more awkward to clean out and glue.
__________________
User name is offline   Reply With Quote
Reply

Tags
tubes


Posting Rules
You may not post new threads
You may not post replies
You may not post attachments
You may not edit your posts

BB code is On
Smilies are On
[IMG] code is On
HTML code is Off
Trackbacks are Off
Pingbacks are Off
Refbacks are Off


All times are GMT. The time now is 03:46.


Powered by vBulletin® Version 3.8.8 Beta 1
Copyright ©2000 - 2024, vBulletin Solutions, Inc.